April 29, 2011

Hotkaps and Cloches

It's an abnormally cold year. 
I've seen empty garden beds, drooping tomato plants in windowsills, and rusty garden tools.

Well La Nina, you are not stopping me. Time to talk cloches (the purpose of a cloche is to protect a plant from frost, winds, or heavy rain). 

I found these at the local garden store and have successfully been using them on my lettuce and strawberries. 


Here is how you can use them:
  • Place over newly planted seeds, it will keep them warm and toasty. They will also prevent your seeds from drowning in the case of a rainstorm.
  • Place over transplants, this will help them adjust to being outside.
  • Keep around the base of tomato plants, if you ever get to plant them. 

Here are some things I have learned by trial and error from using HotKaps or other cloches. 
  • They need some sort of ventilation to keep your plant from suffocating or getting too humid. I cut holes in the HotKaps:

  • With HotKaps you can rip open the top to allow the plant to keep growing while keeping the base warm (similar to the tomato picture above).
  • If your cloche seems like it won't allow much sun in, you may want to take off the cloche during the day and put it back on at night. 
Here are some other cloche ideas:

Remember these bottles from this post?

This is a top from a leftover seed starter kit:

What else could you use as a cloche?

April 28, 2011

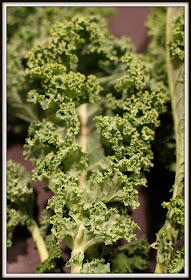
Kale Chips

Does anyone else have a hard time figuring out what in the heck to do with kale? It's so easy to grow, but so easy to screw up when cooking it. 

I get antsy with recipes that require too many ingredients, too much time, or too much clean up (I can hear my husband laughing now). This recipe is right up my alley. 

Kale chips
You will need:
  • Kale
  • Salt
  • Canola or olive oil
1. Separate your kale into bite size pieces and remove the stems.

2. Brush both sides with a light coating of olive oil (or any oil of your choice).

3. Dust with sea salt, a little goes a long way.

4. Place in the oven for 15-20 min on 375 degrees.
How do you know when they are done? As soon as they look gross, they are done. 

They taste better than they look, I promise. Similar to popcorn. 

Mason even liked them.
Enjoy these crunchy healthy treats!

April 26, 2011

Heirloom or Hybrid

Have you ever wondered what kind of seeds you should purchase? At the gardening store, I saw a woman with two tomato seed packs in her hands; one said "Heirloom" and one said "Hybrid". 
Hmm, which one is better?  


Here is a break down:

Hybrid 
What are they? Seeds that come from plants that have been pollinated with two different varieties to produce plants that are disease-resistant, good for short growing seasons, or produce more fruit. These are often called a F1 Hybrid.


What's good about them? They are great for gardeners who live in short growing seasons (cough, cough...Seattle).


What's bad about them? You cannot save the seeds. They will either be sterile, or you will end up with a plant that does not resemble the original. My opinion: they do not taste as good as heirlooms. It seems that although you receive high yields it's at the expense of the flavor! They also are more expensive to purchase.

Heirloom


What are they? Seeds that have been passed down from generation to generation, and can be hundreds of years old. These seeds are pure, in that they have not been cross-pollinated with other varieties. Most of time you will find heirloom seeds in vegetable varieties that self-pollinate such as lettuce, tomato, and beans as they are the easiest to keep from cross-pollinating with other varieties.


What's good about them? They usually taste better and frankly I find them interesting. Have you ever seen those odd-shaped, crazy colored tomatoes in the super market?


What's bad about them? They can be hard to find. They also may be more difficult to grow.

What if my seed pack doesn't say?
Your seeds are most likely open pollinated, but can't be considered heirloom or hybrid. Heirlooms are open pollinated as well, but remember; they are only pollinated by the same variety, or by itself.

So why wouldn't that be a hybrid? Seed packs that state "hybrid" are specifically cross-pollinated manually to produce a certain characteristic such as insect resistance.

I try to buy local heirloom seeds (Washington or Oregon). It is my thought that local heirloom seeds have adapted to the growing climate in my region! What is your preference?

April 25, 2011

Grandma's Secret Weapons

Composting is great, we can all agree on that. But turning your compost and aerating it can be a pain. Especially if you are 86 years old!

Wait until you see this secret weapon.

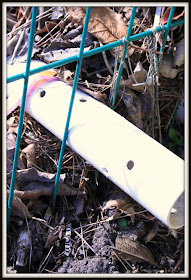
My Grandma purchased some PVC pipe at the local hardware store and had my Uncle drill holes throughout it:


Next, they placed the pipe through the compost cage, so that it sticks out on each side. Air is able to come  through the ends and travel to different layers of the compost!


Why do you need to aerate your compost? Simply put, it speeds up the decomposition process. Tiny organisms (bacteria) live in your compost, and with a healthy supply of oxygen, will multiply and speed up the process of breaking down the matter in your bin!

April 22, 2011

Lasagna Gardening

This is a technique to start a new garden bed that I've been dying to try. 


Lasagna Gardening is a concept developed by Patricia Lanza, that focuses on a no digging, no tilling method for creating a garden bed on grass, weeds, or poor soil. The idea is to block the weeds or grass, and then layer organic material on top. It's been said that this method will greatly increase the productivity of your garden!

Here is the recipe

1. Find where you want your new bed to go and try to level the area as much as you can.
2. Cover grass, weeds, or soil with wet newspaper or cardboard. This will kill whatever is underneath.
3. Water it down. 
4. Add about 2 inches of peat moss. Water this down as well. Try using the mist setting on your hose as peat moss tends to repel water if it has dried out.
5. Next, you want to add layers of organic material. Lanza suggests alternating between carbon rich material (brown), nitrogen rich material (green), and peat moss. 
  • Carbon Rich: dead leaves, straw or hay, small twigs, wood chips
  • Nitrogen Rich: Grass clippings, manure, leftover vegetables, egg shells, coffee grounds (you can get free coffee grounds for your garden at your local coffee shop)
6. Your garden box should be anywhere from 12-24 inches deep.
7. Finish with a layer of compost or mulch
8. If you can place a plastic tarp over your garden for a week to help heat up your layers, this will assist in the composting.

(picture from http://ucanr.org)

I used the "Spring method" which involved using mostly brown material for layering and not as many layers. It's possible to plant the same day with the above method. Being in a cooler climate means my Lasagna Garden will not break down as fast as I would like it to. 

Here's how I did it:

My shiny new garden box contained part old garden dirt and part grass. I covered the dirt and grass with newspaper (I used a thickness of two sheets, see below). You shouldn't stand in your garden bed, by they way, as it compacts the soil. So do as I say, not as I do!


I watered down the newspaper to help keep it in place (below).

I added 2 inches of peat moss and watered it down again.

I added compost from my bin, and more peat moss.  

I added top soil from the garden store. Next, I will add my transplants and mulch to keep the soil warm.

You can also do this in your containers as well to create nice, fluffy, nutrient-rich soil!

Is anyone else craving lasagna now?
Image from this fabulous recipe: http://creampuffsinvenice.ca/2006/08/17/my-mothers-lasagna/

April 21, 2011

I really did it.

I tore up my entire yard; garden boxes, grass, my asparagus that would have finally produced this year. I decided to start from square one....at the end of April. Oops.

I got so carried away I went from weeding, to digging, to sledge hammering. 
I came away with a lot more garden space, some new tips (stay tuned for tomorrows post!), and a sore back. 

Before: not enough room, grass creeping over the edges, mint taking over the garden, and to be honest the dog pee'd in it a few times. 

 I started to dig, Mason found a cozy spot.

See he really is my gardening partner, what a helper!

 This has got to go! Brick planters? With dying Lavender? Not good for my reputation as a gardener.

My husband came home to a lovely surprise, time to make new raised beds!

 Here is a sneak peak at ONE of the new beds! Enjoy it while you can buddy!

I had some helpers collect worms to put in the new garden box too!

Stay tuned for Lasagna Gardening!

April 19, 2011

Sun-Loving Veggies

When planning your garden, it's important to plan around the sun. Keep an eye on your garden and notice which area receives the most sun. A general rule of thumb is if your plant produces fruit (such as tomatoes, cucumbers, squash, and peppers) they need the most sun (8 hours a day). If they are leafy or are root based plants they can tolerate less sun throughout the day. So plan accordingly!

Require the most sun (8 hours)
1. Melons
2. Tomato
3. Squash
4. Pepper
5. Eggplant
6. Cucumbers
7. Corn
8. Beans

Partial shade (6 hours)
1. Peas (although the more sun, the sweeter they taste!) 
2. Potatoes
3. Carrots
4. Beets
5. Broccoli
6. Cabbage
7. Basil
8. Strawberries


Require the least amount of sun (2-4 hours
1. Most herbs
2. Lettuce
3. Chives
4. Kale
5. Pak Choi
6. Spinach
7. Swiss chard


I usually grow sun loving vegetables in pots, that way I can move the pots around as the sun moves throughout the day! I'm sure my neighbors think I'm crazy.

58Q6UT4C8XZZ 

April 18, 2011

Grandma's Secret Weapons

As you know from reading Grandma's corner, my Grandma is a serious gardener. 
She is so creative with caring for her garden, and comes up with the most interesting tools, styles, and pest protection ideas. Wait until you see some of the things she has come up with. Right now she is having a "slug off" with my uncle. Stay tuned for results and tips!

Last year I was strolling through Grandma's garden and snapped some photos of some things that really made me scratch my head. 


Any guesses?

This rag is soaked in ammonia and keeps rats, raccoons, and other varmints out of the garden. Grandma says the problem is remembering to re-soak the rag but that it works like a charm! 

Another option? Grandma says moth balls in small containers throughout the garden.


Keep those strawberries for yourself and try some of Grandma's secret weapons!

April 15, 2011

Preparing Your Soil

 I see sunshine in our future.  7 whole days in a row (I choose to ignore the rain drops). I've begun dreaming about all the things I'm going to do, I've got my sunglasses ready, and my flip flops waiting by the door. I can't wait to crawl out of my cave of gloomy darkness. 


While day dreaming, I had a moment of panic when I realized that on your list may be gardening. I haven't even gotten to the good stuff yet. 

I want to offer my number one tip for a successful garden this summer. If you listen to nothing else, I promise knowing the following information will lead to a successful garden.

It's all about the dirt, baby. 

Crappy soil, a professional umbrella term for; lacking nutrients, too acidic, poor drainage, clay like soil, or sandy soil. And living in Seattle, we all have crappy soil.

With the amount of rain we receive, Seattle is known for having soil that is high in potassium but low in everything else, as the rain washes the nutrients out. Unfortunately, just adding fresh compost does not do the trick since your compost is made up of matter from this region that came from soil that is high in potassium an low in other nutrients.

It's time to fertilize. And don't worry this method of fertilizing is green and healthy. Here is your mix:

.5 part kelp meal
.5 part lime
4 parts seed meal (cottonseed or canola seed)
.5 part phosphate

If you can't find all of the ingredients at your garden store, the two most important ones are seed meal and lime. Although I had no problem finding all four:

I purchase each item separately, as I have not been able to find fertilizer that has everything I mentioned above. Most of them include potassium as well, which our soil does not need more of. Potassium does produce large juicy vegetables and a high yield however it also dramatically decreases the overall nutritional value! If purchasing the above is overwhelming then here is what I recommend buying:


In addition, purchase some agricultural or gardening lime. Follow the directions on the back as to how much to add. 

Here is how I mix my parts and store it, I will be adding this fertilizer throughout the summer, so I make a large batch and store it in a plastic container:


Once you have your mixture work it into the first few inches of your garden with a rake. If you have already planted then you can sprinkle around the plants base. However do not fertilize new seedlings until they are established.


The information above comes from a fantastic gardening book called "Growing Vegetables West of the Cascades" by Steve Solomon. It is my absolute favorite garden book, but only for the true garden nerds.